DIY Kaleidoscope..


Hi! This post is an easy DIY on how to make a kaleidoscope with about $5.. all you need is a paper roll (paper towel or toilet paper sized), flexible mirror (can be found at craft/art stores), and tape + scissors.

Cut in 3 equal strips. For a regular toilet paper roll, 1.2 inches works well. If you cut them too small, it can be fixed as long as they’re all the same size.


Pinch the three pieces together and tape at both ends from the outside. Slide into the tube, and your done. Kaleidoscopes usually have an attachment at the end full of stuff, but I wanted to be able to use this as an attachment to my camera lens for a kaleidoscope effect.


If you cut the pieces too small, make the paper tube smaller by cutting it down the center and overlapping the two pieces + taping.

Decorate the outside of the tube with sharpies/ more mirrors. I wrapped a strip of the mirror around it.

If you want to create a more traditional kaleidoscope, try attaching a bag full of leaves or beads onto the end with a rubber band.

Thanks! If you have any questions just contact me.
 

YARN BRACELET DIY!

Hi there! Its been a while. Today I bring to you the updated version of my (for unexplainable reasons) mega popular post from a while back telling you how to make your very own yarn bracelets. The post really pushed my blog to becoming more popular. The feedback was so intense that now I’m the first that pops up when you google “yarn bracelets”.  The post was a really early post, before I knew much to anything about cameras. I decided to remake the tutorial so it will be easier to understand (and see)…

First, cut two pieces of yarn in whatever colors you want at about two feet long each.
Then, tie them together.
Cut a third piece of any color (it will barely show if you tie the knot tight enough) at about 4 feet and “fold” at the half point. Lay it out like this:
To begin knotting, take one side and cross over the middle section.
Take the other side and “fold” it over the first side.
Take the opposite side you started with (for me its the blue) and go under the middle and through the loop you created.
Make sure to tape down the mid center if your just beginning at this. Pull both strings tight against the middle to get your knot going.
Repeat starting with alternate sides each time. After two you will notice the “V” starting to form…
When your finished it will look something like this:
Happy Crafting! My absence is due to me maintaining my fine arts website & tumblr.
Heres a side by side comparison showing the change (:
(after)
(before)


Use my Amazon discount codes when purchasing all the needed items online. Thanks for a continued support through the blogosphere community!
 

Electric Tape…

TY PAWLOWSKI
Hello! It’s been a while! Today I’d like to show you a little project I just completed (although it will probably be ever-evolving). I wanted to fill the blank space above my bed with something cool, but very cheap.
I saw the idea of using electric tape to frame and tape prints on the wall in http://bedroom.solutions/best-adjustable-beds/. I wanted to use that idea but expand on it. Here are some tips when using electric tape…
1) Electric tape is stretchy, there will be a level of comfort when you use it because it can almost always stretch to fit.
2) When stretching, it can sometimes peel more easily due to the tension.
3) Use a credit card to smooth the tape and get rid of bubbles.
4) Sketch it out if you want to on the wall before.
5) Electric tape is a little less sticky than painters tape so I doubt it will leave a residue on the walls afterwards.
6) Buy at least 2 packs. It is very cheap but it can be used up faster than you might think. The whole headboard took about two rolls. Here it is in proportion to me so you can get in idea of how big it is.
So this cool new addition to my room only cost about $2!
Click below to see a little tour of my room/workspace…
On the topic of my room, it has changed a LOT since I first gave you a glimpse. Here some snapshots I took more recently.
I have really gathered a collection of cool small things and organized them for a neat shelf display.
I bought this old hardware organizer and revamped it over the summer to help hold all my odds and ends.  Here is the area above my desk (Electric tape frame). I’m really happy how it came together since it was kind of a spur of the moment decision.
The area where I do most of my picture taking is here:
Overall my room has changed (for the better) and now I have a small but efficient studio space where most of my creating happens (:
 

Macro Photography…

I ordered a set of macro filters from Amazon (here) and for all that I have used them for so far, they have worked great! It comes with a x1, x2, x4, x10 filters. They screw onto your existing lens and then they can screw together like this:

The four relatively thin filters came clear and dirt-free in their own little carrying case!


I have had them for awhile now so I would like to share with you some of the tips and tricks I have found after experimenting with them.

Firstly, especially when they are stacked like I showed up there, they can create a vignette sort of ring. Unless this is the effect you’re going for, you can get rid of it by zooming past the ring. This may create some difficulties with focusing onto your subject so it is something you have to get used to.
please excuse the dirty keyboard!

Secondly, Manual focus is a must. Because it is an add on and has a pre-set aperture, there is more work involved to get your subject in focus with a combination of zoom and how close you get to your subject.

Gus’s eye
Thirdly, because the depth of field is so shallow, it might help (if your camera has the function) to see it in real time on the LCD screen instead of through the viewfinder thing. Especially because auto focus is hard to use.
My tastebuds! Eek!

Also, Gus was being a cooperative model but I would suggest still objects like flowers and small objects instead of the living things that are extra tricky to capture – unless you’re up for the challenge :).

You can always practice with your fingers, especially fingerprints, and your eye. I find those are the two things I take pictures of the most because… well… I always have them with me!

It really is just a matter of experimenting I’d say, it took a little while for me to get used to having these extra things on my camera. Hope this helps :).
 

Film Roll Candle Rings…

Lets face it, film is getting more outdated every second and new generations (including some of mine) may not even know what it is. The effects film gives to a picture are popular now and can be seen in the filters on Instagram too.  I personally like the negatives more and we have plenty of them at my house stashed in our closet.
I thought I might as well help others put these cool pieces of art to use. This is super simple, a 30 second project.
They are obviously pretty transparent which works great to make a little candle ring! All you need is a fake candle, I think a real candle might burn the edges but I don’t want to find out. Unless you do it and it ends up looking cool :).  I’ve got an overwhelming response that film is highly flammable so I caution you from using a real candle (A “daft Pinterester could burn their entire house down”-laughed about that comment for a while)
Just wrap…
… and tape! If you want extra strength you can tie it together through the holes but I find that the tape is usually strong enough.
I find that it still lets the light shine through. It is just bright enough that if you look closely you can see the tiny pictures :).
Feel free to ask questions or leave a comment – I’ll reply faster if you email me through my contact page :).
Burton Guster – Gus
P.S. If all else fails, Gus really liked to play with these if they fell on the floor. Candle ring or cat toy! So versatile!
 

DIY Animated Blog Header

   Hello everyone! I’m here to share a relatively simple tutorial on how to get a custom, animated blog header like mine:
If you haven’t noticed, I change my headers seasonally but this is the first time I figured out how to get it to move! I realize its nearing closer to winter now, and feels like it due to Sandy hitting the east coast and leaving Ohioans with unseasonably chilly weather. So soon this header will become obsolete and I will get to make a new one! here is a quick synopsis of the evolution of my headers…
Starting with spring’s:


 And then Summer’s
That was quick and believe me, I have had many more headers but this is going to be a sort of theme (somewhat like Google) with the same cool font but different scenarios. I really like to look at the evolution so far, even if it is small so far.
Would you like to make your own moving header? Just follow these easy steps!…
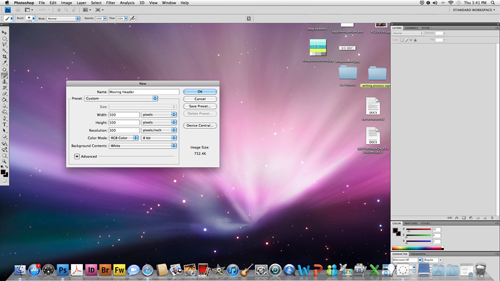
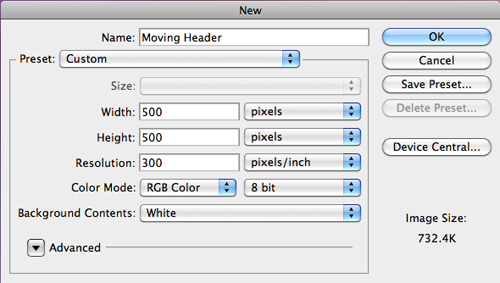
Open Photo shop and create your document. Square isn’t really good for a header but keep in mind, animation makes for some flashy buttons too!


Not many people use the animation in photoshop but you can bring it up in your window by going to window > animation and clicking it.


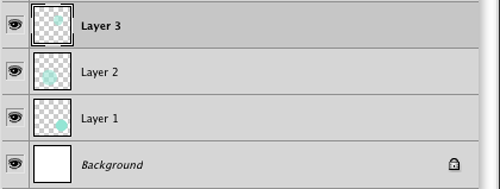
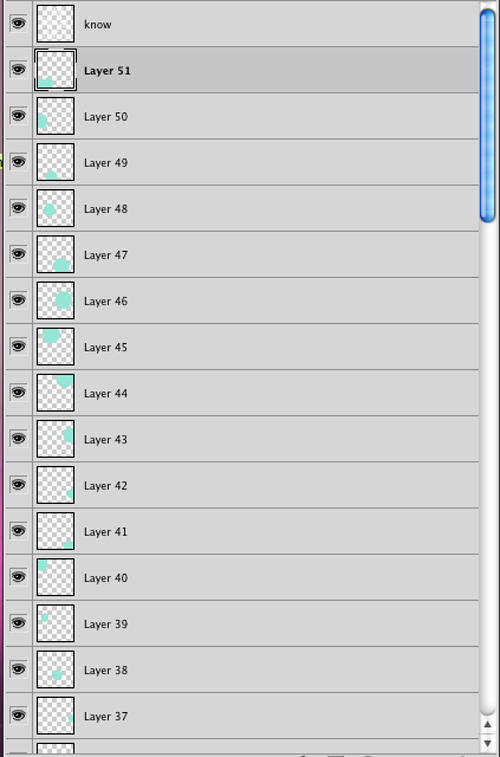
The idea is that each layer makes the movement.


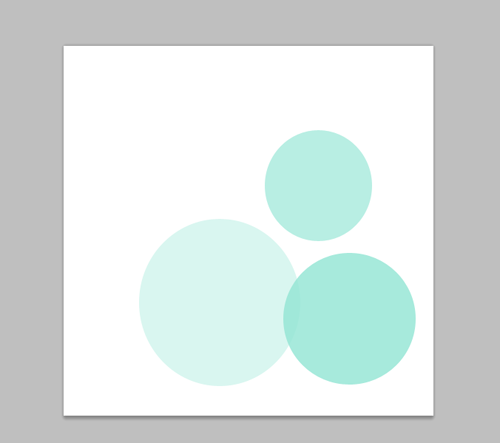
You need all the layers before you can start making the frames. This is usually made for making GIFs so, it also sort of limits your use for it. I used circles to make a bubble-ish effect.


Each circle will be a layer!


I did a lot of circles until it went to almost one solid color.


It builds up to look like this…

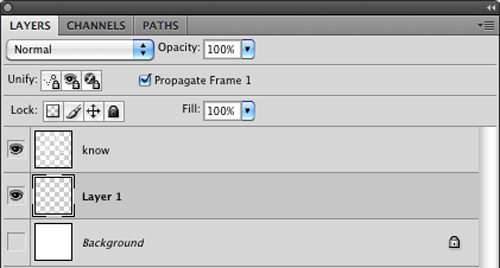
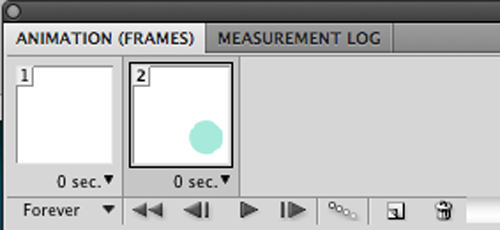
Now turn all of your layers off except the base.


Go to the little arrow on the side and click “New Frame” It will pop up as a frame.


Turn the layers on one by one and repeat.


Continue…


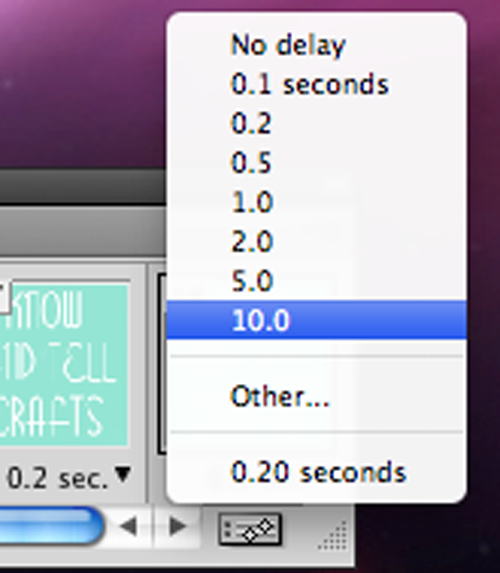
If you want one slide to stay longer, like me (I wanted it to actually be readable instead of passing by really fast).  It is selected at 10 seconds but the longest that I used was .5.


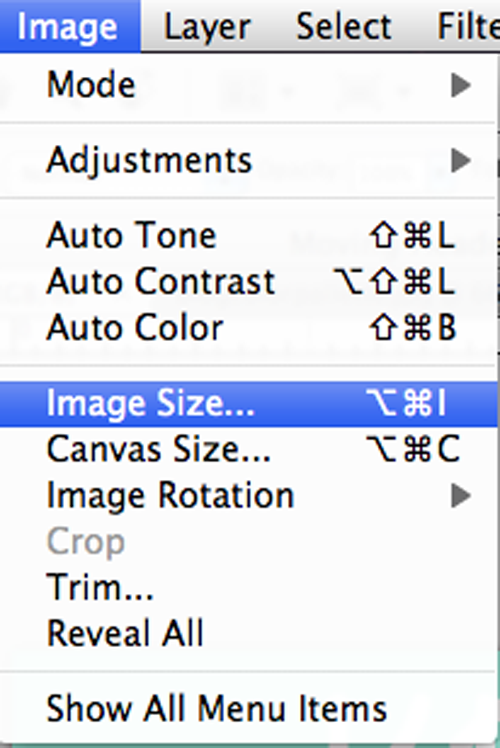
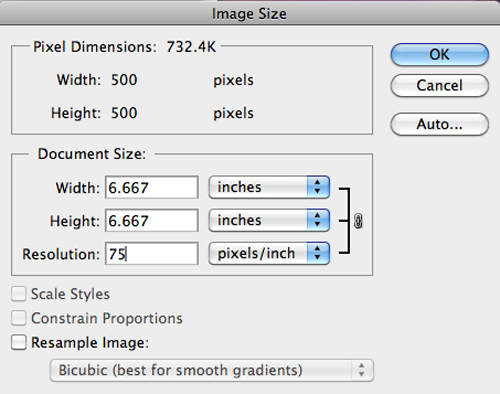
Now the last step is to go to Image > Image Size


Set your Resolution to 75 ( I haven’t noticed a difference in quality using text and graphics rather than photos, but the only difference is that this makes it load faster).


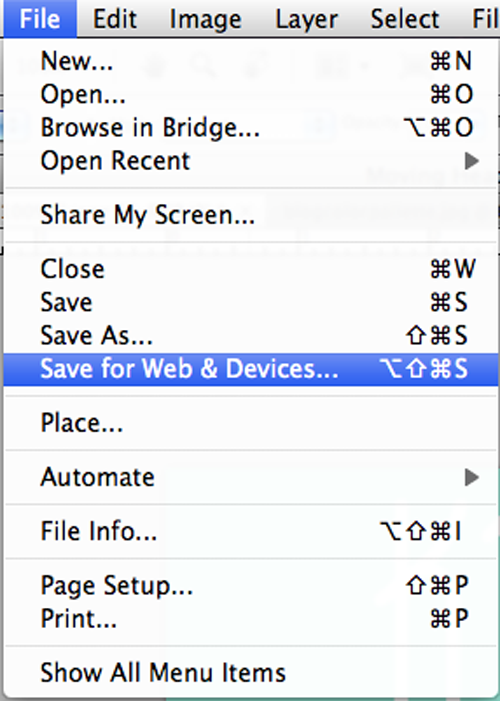
You have to save it as a GIF so what has worked for me is to go to File > save for Web and Devices…


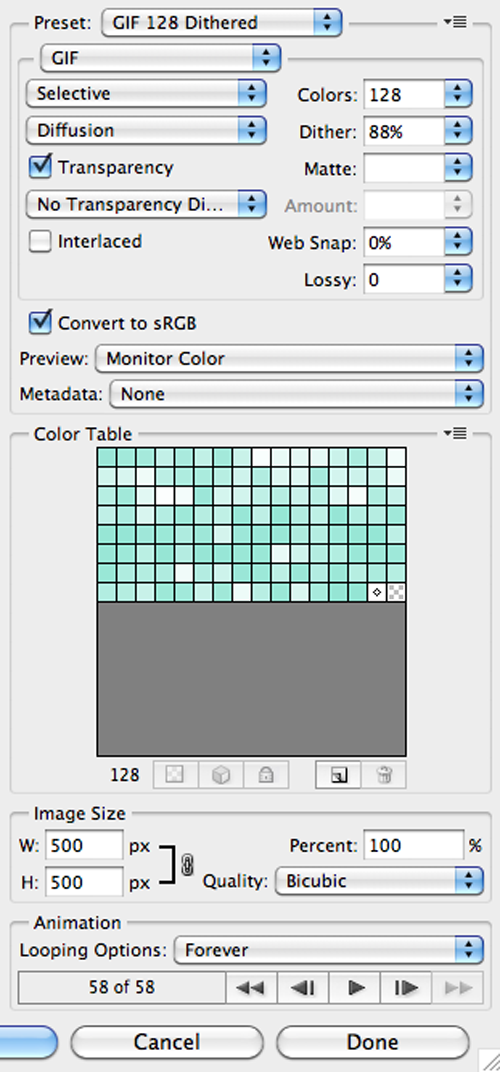
Make the right handed side of the chart thing look like this…


Then just click save and save it to wherever! Blogger doesn’t let you straight upload a GIF to the blog header section, but if you upload it to Photobucket and then copy the direct link it will work. Instead of uploading it from your computer, just paste the link in other box. Hope this helps!
Did you make an animated header for your blog? Email me the link to your blog at knowandtellcrafts(at!)hotmail(dot!)com
I’ll be sure to check it out!
 

Halloween is Around the Corner…

I know I’ve already done a pumpkin tutorial this year, but the more the better right? I saw this idea after my aunt showed it to me last year around this time. I can’t for the life of me remember who posted it, but ever since I have known I was going to make these adorably awesome vampire pumpkins!

I got pumpkins for a really good deal at our local fruit farm, Lynd’s. I got this super perfect small one for only 50¢!


All you will need is the basic tools they always sell at Target around Halloween time. For some reason my family never used them until last year. They are cheap, and totally worth it! After this year’s Halloween season is over make sure to get them while they are discounted so you can use them the next year! Anyways, you should also get a pair of those cheesy vampire teeth and obviously a Pumpkin.


Take the cool looking one (above) and trace your teeth in a rough draft sort of way.


Once you have defined the shape, cut it out!
Pumpkin guts…


Hollow it out with a spoon.
Insert your teeth! (I do not mean to insult your intelligence by giving you this overwhelmingly easy tutorial). It might take a couple times for it to fit just right.
Put a fake candle in there – i lined it with foil to make it extra reflective and bright.


Boo!


Creepy? Well I’ll leave you with cat pictures. Here is my Aunt’s cat Schroeder:


And her other cat (they are brothers) Linus:


Happy Halloween!
 

Faux Taxidermy Deer Diy

Make your own deer head! I’ve been wanting to make a fake deer head like this for an unreasonable amount of time. Well I got around to it today! First of all you’ll need to print these out. They are templates, cut them out and they will piece into each other to make the deer/moose head you see above! It will only take two pieces of paper, and will make a cute-sized head. Oh and most importantly… PRINT ON CARDSTOCK.

Here are the printables once more…

Note: The so called “Noggin” is actually apart of the neck. Now you can make it in just three easy steps.

Thats all! Print, Cut, Create. Once you print it out its pretty self explanatory how it goes together. But if it isn’t here are all the different parts labeled and put in place.

Antlers

Snout

Main Part 1

Neck

Neck 2. Please note that I made a mistake in calling it a noggin on the printable, oops!

Main Part 2.

Ok well I think these would look cool pretty much anywhere, plus they are so light that you can just tape or tack them up on the wall. I folded the back strips that stick out to be plat and then taped it up that way. Here is the sideview.

I am super stoked about this and I might just go make some more ;). Will you make one? (or more?) Leave a comment below.

Thanks as always :),

P.S. I have to give the credit where credit is due to Christina Loff from Chronicle Books Blog whose template was modified to create the free printable I have today. Thanks Christina! 

DIY Mustache Necklaces!

Ok so this week I made some awesome mustache necklaces. I realize this trend is sort of fading from the craft and blogging world but I still love the shape and coolness of mustaches. I used Fimo Soft and Fimo effect clay. Both in which I talked about extensively in my first clay review here. Its an amazing type of clay, and well you can read the rest there but it is really fun and easy to work with. You can actually make this necklace very, very easily. First roll out your clay…

Cut two mustaches out of the clay if you’re not good at freehand cutting lay then try drawing one one paper.. Cut it out and then cut around it on the clay. Now roll two small balls that will be proportioned so they will fit like this in the mustache.


Put your second mustache on top of the other mustache and two balls. The balls give it some shape.


Your mustache should look something like this.


You can see there is a seam usually. Sometimes it is worse than other but if its noticeable than just smooth it with a sculpting tool or your finger. Here is what they should look like (drawn)


Here is the real version of them.
So there you have it! Its a real fun way to add charm to your neck. Man that just sounds horrible but yes, add charm to your neck. They are really easy to make though so its totally worth it. And now a picture of what you’re really supposed to make these necklaces for…
So yes once you make these you can walk around like me (looking like a complete idiot) but still feeling amazing because who doesn’t want to flaunt a blue mustache? Theres your tutorial! Have a good weekend!
 

DIY ROCK NECKLACES!

Make these cute little charms  out of crushed rocks or crystals!

Hey guys, I am really excited about this next DIY tutorial because I got to smash things to pieces with a hammer! This was so incredibly fun for me because, well seeing rocks explode is fun! But I wasn’t just destroying pretty rocks for nothing, I was putting them to good use. I had a whole bunch of pretty crystals that would be perfect to sparkle in the light around someone’s neck!

You will need those little glass tube charms that they sell at any craft store. I just found the ones in my crafts store which were at the very bottom of the jewelry shelf, all dusty and old. But for about $1.50 each (two came in a pack).

The rocks I used were (from top) pyrite, also called fools gold, a home-grown crystal from a cheesy little kit, and that mystery rock that I found in my rock box! I don’t know what its called but I will refer to it as rainbow rock because thats what it looks like :). I also made a blue and yellow necklace out of the same home-grown crystal stuff. I used those because I liked how it got really light and pastel-like!
Now for the DIY, it is pretty self explanatory but just in case you don’t understand I gave it captions.
1) Get your hammer out.
2) Give it a good whack with your hammer…
3) Now lightly tap it (depending on your rock, mine was easy to break) and try to get it into a small chunks or a powder at least small enough to fit in your glass container.
*one important tip: don’t force the rock in, or else it might end up like this:
Now that isn’t pretty! 🙁 And I had already filled it with pretty rainbow rock!


Now hang it from chain, I like the look of really thin chains so thats what I used! I’ve been meaning to try magnetic closure but the classic little hook thingy works well too.  So with useless old rocks or crystals, you can make a beautiful necklace that will have people coming up to looking at your interesting piece of jewelry!